Colonial Barracks was an excellent TSATF convention. I got to catch up with old friends and play in games. One of the things that impressed me was Richard Smethurst's 15mm games, to the point that I went out and ordered a bunch of 15mm Egyptians (momentarily forgetting the Fuzzy-Wuzzies to oppose them).
Both Colonial Adventures and TSATF use a 20-man unit including an officer and NCO. Richard had based his figures 2 to a 20 x 30mm base. He used base removal to mark casualties at a higher level. Each 20-man unit equaled a company. I'm using the same bases, but I'm playing at the unit equaling a platoon, two platoons equaling a company with another officer added.
Here is a unit of Egyptian infantry in Formed Line. This formation, though slow to move, can volley fire, very important in Colonial Adventures, since each hit caused by the volley results in a reduced Reputation for the target, who then tests to see if they stay or go. This is very important when the Rep 3 Egyptian infantry is firing at a Rep 5 Beja mob! The figures are Old Glory 15s, not Blue Moon, which are 18mm.
The officer is marked by a white rock and the NCO by a darker one. All figures here would be able to fire.
Ammo can run low, and casualties must be taken, so there are two figures on half-sized single bases. I chose to leave the officer and NCO on double bases, and will mark them with rings if they become casualties. This is to remind the player that the unit is leaderless. When ammo runs low, a figure is sent to the ammo dump to replace the ammo. Why send 2 figures when 1 will do?
Egyptian companies each have a different flag. The first company's is blue. I have marked all the bases in this unit in blue with a 1, to indicate the 1st platoon of the 1st company. The second platoon will be marked with, tah-dah, a 2. This photo also shows the 2 single bases.
Next is a unit of Egyptian gendarmes in Mob formation. They are a police force, and not really as well trained as the regular infantry, so they will only be able to adopt the Mob and Open formations. This means they cannot volley fire. Right now, there are only 16 figures in the unit. I'll have to see if that makes them too weak, on top of not being able to volley fire. Their unit also includes 2 single bases. Essex figures with a Old Glory 15s officer.
These are all the figures I have finished, though there is another regular infantry platoon half finished on popsicle sticks, and 4 more finished gendarmes still mounted on sticks.
I have another company of regular infantry still in the bag, a company of Sudanese infantry, cavalry and artillery, but I'll stop at the second platoon, to paint Fuzzies coming from Stone Mountain.
Friday, November 25, 2016
Friday, September 30, 2016
Salvage Run: a 2013 5150 game.
This is a 5150 AAR I did in 2013 and put up in the Yahoo group. I figured I'd add it to my blog, even though the rules are outdated.
Salvage Run
Salvage Run
The following is a solo game
using the Xenoform part of 5150, and various interpretations from earlier Two
Hour Wargames rules.
Planet New Iberia is the scene of sporadic combat
between humans and bugs. All has been
quiet for several months now. The mining
outpost of Wheel Leisure has been abandoned since bugs were found in the lower
mines. Everyone left in very hasty way,
so lots of valuables were left behind.
Bailey Mull had talked to enough
drunken miners at the spaceport bar to realize that there were lots of goods in
Wheel Leisure ripe for the pickings. Her
good looks and free hand with drinks brought some very exact info as to what
she could expect to find for salvage.
Her ship, Grifter, had lain on a
rocky ledge for 3 days as she and her crew scouted out Wheel Leisure for any
signs of bugs. For 3 days, there was
nothing but the wind to disturb the dirt streets.
She had six crew in three
vehicles to head to the warehouses on the far side of town n The crew consists
of :
Bailey Mull: Rep 5, Hard Armor,
Assault Rifle, Stone Cold
Froggy Hunter: Rep 5, Assault Rifle, Slow
Al Scramuzza: Rep 4, Assault Rifle, Hard As Nails.
The Ferret: Rep 4, Flamethrower,
Brawler
Izzy Knot: Rep 4, Grenade Launcher, Medic
Natalie Goodbody: Rep 3, Pistol,
Ambidex- terous
They were in three vehicles.
The lead vehicle was a Teixeira
T35, an armored half-track, with a heavy machine gun in an enclosed turret, and
a flexible mount light machine gun. The
T35 was cobbled together on a mid-tech world, and due to being just good enough
to do the job, and low cost, was as common as a Volkswagen beetle was in the 20th
century. The vehicle was driven by Natalie, with Al riding shotgun, and Bailey
in the turret.
Next was a pickup truck, driven
by Izzy, with The Ferret as co-pilot.
Tail-end Charley was occupied by
Sadie,a Salvage Dog halftrack with a lightly-armored cab and a flexible mount
light machine gun. It’s driven by
Juliette, with Froggy riding shotgun.
Bailey led the parade down the
main (only) street in Wheel Leisure until a bug hole opened up and out poured a
mix of Big Ones and Little Ones to the tune of one dozen.
Bailey immediately let rip with
the HMG and killed one Big One. More
bugs filled the holes in the ranks, and Bailey kept shooting, knocking out a
total of 2 Big Ones and 2 Little Ones.
And then 4 Big Ones jumped on the T35, blocking the driver’s vision, and
too close for the turret gun to bear. As
the T35 came to a halt, Izzy gunned the pickup around the bugs and headed for
the warehouse. Sadie lumbered up, and
Froggy hosed the T35 with LMG fire, taking care of 3 bugs.
Bailey hoses the bugs that didn’t
make it to the T35, and takes out 2, and tells Natalie to run over another
2. She misses. A Big One charges Sadie, but Froggy guns him
down. Meanwhile the last Big One on the
T35 strikes frantically at it, but can’t damage the T35. Since the T35 is impervious to LMG fire, Froggy takes care of the last Big One on
board.
Up the street, Izzy and The
Ferret jump out of the pickup and enter the warehouse.
The T35 takes care of the last
Little One, and heads up the street.
Sadie inexplicably hangs back.
(Juliette’s lousy Rep 2 plays havoc with continuing activation)
While Izzy and The Ferret start
looting the warehouse, the T35 turns around and comes up next to Sadie. Bailey opens the hatch and screams blue
murder at Juliette, who lurches forward.
Natalie keeps the T35 fender to fender with Sadie, as Bailey makes
interesting comments as to the family history of Juliette, while the 2 vehicles
make their way to the warehouse.
Bailey leaps out of the T35, and
jerks Juliette out of Sadie, and continues to chew on her, while everyone else
loads Sadie, glad not to be Juliette.
Natalie goes to check the fuel
tanks across the street, and the pickup starts back to the Grifter.
Sadie is loaded, and Natalie
moves the T35 to the tanks to fuel up.
Suddenly 14 bugs pop up between
the crews and the way out. The pickup is
long gone, and going faster. Only Bailey
sees them. She jumps back into the T35,
and yells at Natalie to get in and drive.
Sadie rounds the back of the abandoned hauler, and Froggy spots the bugs
and takes out 1, and runs out of ammo
Natalie spins the T35 and Bailey
takes out 1 bug. Froggy reloads.
Bailey fires again, and knocks 1
out. Froggy takes out 2.
The T35 and Sadie move slowly
forward and fires. Bailey takes out 1,
and click, click, is out of ammo. Froggy
misses and is out of ammo.
Natalie guns the engine as Bailey
reloads and Sadie lumbers forward as Froggy reloads. But while they are unloaded, a Little One
leaps on the T35, and another jumps on the front of Sadie, and attempts to get
Froggy, who gives him a haymaker on jaw, with no effect.
Both the T35 and Sadie move out,
with bugs clinging to them. Froggy and
the bug spar ineffectively.
As they roll forward, a sudden
lunge from the bug kills Froggy. The bug
continues to slice and dice, and Sadie rolls to a halt, as Juliette grabs for
her machine pistol. The T35 continues
on, unaware of what is going on behind them.
Bailey opens the hatch and kills
the bug on the T35 with her assault rifle.
Only then does she realize that Sadie is halted, and can only watch as
the bug slips into Sadie’s hatch and kills Juliette.
The T35 spins around, with Bailey
firing with her assault rifle, since the HMG is too low to have any chance of shooting
down the hatch, and might damage Sadie.
As they pull alongside, she
finally pink mists the bug. She sends Al
to get Sadie running so they can get out of Dodge with all of the goodies. Al cleans out enough goo in record time, and
Sadie lurches forward.
As they pass the only 2 story
building in town, the second story door swings open and a young voice yells,
“Hey, don’t leave me, you salvage skanks,” and Niki the Twister sprints down
the stairs, onto the T35, and into the co-pilot’s hatch that Al left open.
Bailey screams at her, and
Natalie says they can’t leave her; she’s just a kid.
Bailey groans, “And you thought
the bugs were trouble?”
Even in a vehicle, bugs can give
you trouble. The bugs were very
unfortunate in activation rolls, or the game might have gone differently. There was also a bug activation 45” off the
table, so it was ignored. The humans were
drawn with the ATZ NPC table, with appropriate weapons for the figures I had.
Sunday, September 25, 2016
The Wounding of Egbert the Eveready by Ase the Average
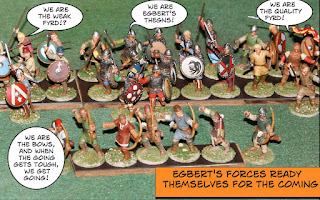
I finally have just enough Vikings and Saxons to put on a battle between 2 persons of Medium Social Standing in Two Hour Wargames Captains and Kings. So without further ado, let's introduce the two sides. First is Egbert's retinue. All the figures are Wargames Factory.
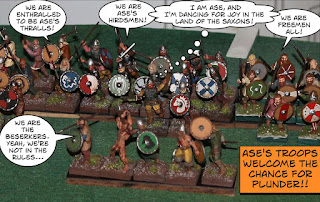
And now, Ase's retinue. The hirdsmen and thralls are Wargames Factory. The Freemen are Gripping Beast Dark Age Warrior plastics, and the berserkers are Old Glory, Hasslefree, and Wargames Factory.
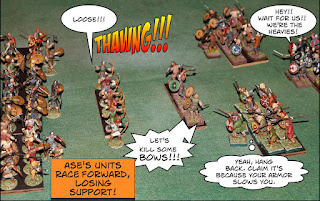
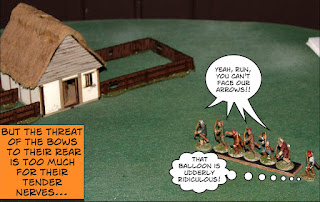
Egbert was anxious to get at the Vikings, so he moved forward quickly. The Vikings proved no pikers, and ran at the Saxons, breaking their formation. They were unable to close, and the beserkers ended up short of the bows, who sent arrows their way.
As the archers' fire was having a bad effect on the beserkers, Egbert moved his troops behind them. The beserkers lost one figure to the arrows, but 2 more fled. Some berserkers.
The archers ran to the left flank of Egbert's retinue, knowing they were no match for anyone with a shield and melee weapon. Egbert charged the remaining two berserkers, and slew them, though he lost a man in the process.
The Saxon Weak Fyrd charged the Viking Freeman, probably not a wise decision, but they are Ferocious. The Saxons lose a figure, and 2 more run away. The Vikings, of course, lost a single figure.
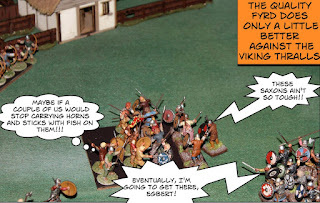
The Saxon Quality Fyrd charge the Viking Thralls, and lose 2 to the Viking 1. Things are not going so well for the Saxons.
The Viking Thrall continue their melee with the Saxon Quality Fyrd, and come off best again, with 3 Saxon casualties to their one. The Viking Freemen continue the carnage on the Weak Fyrd. Ase finally gets his hirdsmen into the Saxon thegns. The Saxons lose two to one, but one of theirs is Egbert himself, wounded and out of the battle, regardless of what it says in the picture below. This brings all advance from the Saxons to a halt, but none break.
The Saxon Weak Fyrd are destroyed, but the Viking Freemen turn tail and run.
The Viking hirdsmen and Saxon Thegns continue their fight with equal casualties. The Quality Fyrd fare poorly against the Viking Thralls.
The Quality Fyrd and the Viking Thralls continue to trade blows with equal effect. The Saxon bows move to the Viking right flank.
The Thralls wipe out the Quality Fyrd, but the Saxon bows now have no reason not to shoot at the Thralls, and kill 2. The rest run!
In what was the center, the hirdsmen continue to deal damage to the thegns, but their nerve also breaks, and the remaining Vikings run!
The Saxons win the day with 2 thegns and 8 bowmen.
In Conclusion:
I gave the berserkers Rep 5 AC 2, Ferocious.
I forgot to roll for Egbert. He was wounded and not killed. If a melee unit causes an enemy unit to run, they pursue. In both cases here, the Viking units destroyed the units, and had to take the in melee test. Both were below half, and both failed by 1d6 and routed.The Saxon thegns could have pursued the Vikings, but with only 2 figures against 5, it wouldn't have been wise.
A work about the figures. I've been building Wargames Factory for a while. I like the separate arms and weapons. The Gripping Beast Dark Age Warriors are ok. They only have 5 different figures, two of whom seem to be hunched over with appendix attacks. You must carefully consider what heads you put on those figures, or the shields will come nowhere near the figure's left hand, and will have to be glued to the beard and skirt of the figure. The GB figures are a little crude, with only pouches on one figure. The shields are not to the standard of most others, having no fasteners to hold the edge binding on. There are heat cracks, quite small, on the backs of some. There are no helmeted heads, and only one head with a fur-lined cap. There are none of the Phrygian caps, though they are shown on the box art.
The Wargames Factory spears are weak. I am now using plastic broomstraws in their place. They must be superguled in. Solvent glues won't work. All things said, I far prefer them over the Gripping Dark Age Warriors. Gripping Beast Thegns are fine, and of a higher quality.
Saturday, July 9, 2016
A kirk for my Saxons
The Nothelm Chronicle inspired me to copy him and make a Saxon kirk from the Dapol (ex-Airfix) village church. I didn't do any assembly photos, since the church is pretty simple. However, it's HO/OO scale and too short for 28mm.
To bring it up to 28mm, I added 1/2" of sheet rockwork to the bottom of the church all around. In a marvelous example of serendipity, I had a Plastruct rectangular tube that exactly matched the width of the columns cast on the church. I only had to cut them to height and depth with a razor saw. I did a little filling with Squadron Green Stuff. and then painted it. The roof was thatched with funny fur (a.k.a. teddy bear fur). The cross is a jewelry piece painted to look like weathered wood.
Here are some photos after I based it. The thatch is a bit darker than it photographed. The figure is a Wargames Factory Saxon for scale.
Saturday, June 11, 2016
Friday at Bayou Wars 2016
We arrived around 9am after the usual terrible traffic in Baton Rouge. (A seven-car pileup completely closed I-10.) We set up our dealer's table, and I began to set up for my 2pm game.
Chris Swearwengen arrived and we stumbled through our first game of Dragon Rampant. I took us a while, as neither of us had played before. After a hard fought battle, my Undead defeated his orcs by a healthy margin. Very enjoyable, even had I lost.
At 2pm, we started my game of Defend the Kirk, Saxons defending against a Viking raid. Here's the table before the start of the game.
If it's not obvious, all the buildings except the 2 4ground buildings on the far edge, are paper, as is the Viking ship and the marshland near the river. The watchtower and wooden keep are an old set called Stronghold from Microtactix. All of the hovels, the kirk, and the longhouse were all designed in Model Builder. The roofs were covered with funny fur to us Yanks, teddy bear fur to you Brits.
Almost all the Viking and Saxon warriors are plastic Wargames Factory figures. The women are a mix of Old Glory and other manufacturers. The rules were Swordplay 2016 by Two Hour Wargames. I made a few mods to fit the game, since it is intended for small actions of 4 or 5 figures per side.
Players in the game were, left to right, Josh Switzer and his son, Richard Allen (Viking commander), Bob Kelso (Saxon commander), Harman, and Michael Hayman. At the table to the left background, facing the camera is Steve Wirth, who was nice enough to lend me his livestock, as I forgot mine. Facing the camera at the right hand table is Jim Pitts.
The Viking advanced from the ship, and were seen by a bowman in the watchtower, who sounded the alarm. The Saxons were slow and cautious in reaction, allowing the Vikings to swarm around a couple of houses before beginning to plunder.
Since there were Saxons of lower Rep inhabiting the hovels, most of the men therein were killed and their women taken as plunder, though a good number of women were able to successfully flee. As GM, I was not able to photograph the game as meaningfully as I would have wished.
Saxon warriors begin to advance, as the Vikings begin to plunder. The Vikings have fired a house, which alerted the countryside, as did the incessant ringing of the kirk bell!
Saxons begin to advance around the tavern.
Vikings violate the kirk, downing Brother Caedfel and the other clergy along with a woman who had sought sanctuary there. There was a berserker in the kirk who had no thought other than the death of all Saxons on his mind. Of course, there was the chest of gold church items to be taken by other Vikings.
More Saxons come in from the countryside.
As others advance to stop the Vikings.
Saxons advance cautiously near the watchtower. For quite a while, only 2 Vikings had fallen, one wounded by a Saxon hut dweller, who paid for it with his life, and another to an arrow from the watchtower. They stayed out of range after that.
A Viking has entered a pen to make off with some livestock, while others make off with a woman and her naked child.
Vikings flank a field near the river, perhaps intending an end run.
Saxons have trapped 2 Vikings in a hovel, where they have killed the husband and captured the wife. A naked berserker has come to their aid.
Melees rage across the table! By games end, the Vikings had lost half their men, captured a few women, some livestock, and food. The Saxons made an attempt to fire the longship, but the Viking guard put it out. The Saxons had failed to defend the kirk, losing all the clergy, but recapturing all their relics.
We decided that the Viking warlord would return a hero, since his lone ship defeated over 1,000 Saxons, captured all their women, and defiled the kirk. All those who died were already drinking mead with the gods in Valhalla..
The Saxons had defeated 5 longships of vicious Vikings, killing hundreds of the scum. However, they had to face the shame of being unable to defend the kirk, from hundreds of heathen berserker madmen who slaughtered the clergy and those who sought sanctuary there.
Would the bishop kindly send more clergy to see to the souls of the departed and tend to his flock, battered by heathens?
And, Eorl, we humbly submit that we might be a little low on our just portion of our crops that we happily render to you, through His grace.
Chris Swearwengen arrived and we stumbled through our first game of Dragon Rampant. I took us a while, as neither of us had played before. After a hard fought battle, my Undead defeated his orcs by a healthy margin. Very enjoyable, even had I lost.
At 2pm, we started my game of Defend the Kirk, Saxons defending against a Viking raid. Here's the table before the start of the game.
If it's not obvious, all the buildings except the 2 4ground buildings on the far edge, are paper, as is the Viking ship and the marshland near the river. The watchtower and wooden keep are an old set called Stronghold from Microtactix. All of the hovels, the kirk, and the longhouse were all designed in Model Builder. The roofs were covered with funny fur to us Yanks, teddy bear fur to you Brits.
Almost all the Viking and Saxon warriors are plastic Wargames Factory figures. The women are a mix of Old Glory and other manufacturers. The rules were Swordplay 2016 by Two Hour Wargames. I made a few mods to fit the game, since it is intended for small actions of 4 or 5 figures per side.
Players in the game were, left to right, Josh Switzer and his son, Richard Allen (Viking commander), Bob Kelso (Saxon commander), Harman, and Michael Hayman. At the table to the left background, facing the camera is Steve Wirth, who was nice enough to lend me his livestock, as I forgot mine. Facing the camera at the right hand table is Jim Pitts.
The Viking advanced from the ship, and were seen by a bowman in the watchtower, who sounded the alarm. The Saxons were slow and cautious in reaction, allowing the Vikings to swarm around a couple of houses before beginning to plunder.
Since there were Saxons of lower Rep inhabiting the hovels, most of the men therein were killed and their women taken as plunder, though a good number of women were able to successfully flee. As GM, I was not able to photograph the game as meaningfully as I would have wished.
Saxon warriors begin to advance, as the Vikings begin to plunder. The Vikings have fired a house, which alerted the countryside, as did the incessant ringing of the kirk bell!
Saxons begin to advance around the tavern.
Vikings violate the kirk, downing Brother Caedfel and the other clergy along with a woman who had sought sanctuary there. There was a berserker in the kirk who had no thought other than the death of all Saxons on his mind. Of course, there was the chest of gold church items to be taken by other Vikings.
More Saxons come in from the countryside.
As others advance to stop the Vikings.
Saxons advance cautiously near the watchtower. For quite a while, only 2 Vikings had fallen, one wounded by a Saxon hut dweller, who paid for it with his life, and another to an arrow from the watchtower. They stayed out of range after that.
A Viking has entered a pen to make off with some livestock, while others make off with a woman and her naked child.
Vikings flank a field near the river, perhaps intending an end run.
Saxons have trapped 2 Vikings in a hovel, where they have killed the husband and captured the wife. A naked berserker has come to their aid.
The bloodiest fight took place over the chest from the kirk, changing hands a number of times before all the Vikings attempting to take it were killed.
We decided that the Viking warlord would return a hero, since his lone ship defeated over 1,000 Saxons, captured all their women, and defiled the kirk. All those who died were already drinking mead with the gods in Valhalla..
The Saxons had defeated 5 longships of vicious Vikings, killing hundreds of the scum. However, they had to face the shame of being unable to defend the kirk, from hundreds of heathen berserker madmen who slaughtered the clergy and those who sought sanctuary there.
Would the bishop kindly send more clergy to see to the souls of the departed and tend to his flock, battered by heathens?
And, Eorl, we humbly submit that we might be a little low on our just portion of our crops that we happily render to you, through His grace.
Wednesday, March 30, 2016
Red Ops 5: Asylum Part 3... and nekkid wemin
I've finished 2 more gangs, the Chainsaw gang and the Franken gang, and here they are!
First up is the Chainsaw gang, and it's obvious why they are so named.
The figures on both ends are the same figure, but they have interchangeable heads. I looked at a lot of chainsaws on Google, and found that the blade that carries the chain is pretty plain. That makes sense, as they are always up against the edge of the cut. The figure on the left has a welder's helmet, blue jeans, and a dark wifebeater. The lower arms are cast as a separate piece with the chainsaw. This gives great grip, but a bit strange around the elbows. The second figure is more nattily (?) dressed with a t-shirt and pants with a pocket chain. One arm and one hand are molded with the chainsaw and must be glued to the figure. Pretty good fit.
The monster in the center has his two arms separate with the chainsaw molded with his right hand and arm. The arms fit into the armholes quite well. I anticipated a lot of trouble getting them to fit but was pleasantly surprised. He pretty obviously is not adept with his chainsaw. All his exposed flesh is covered with nasty scars. A very impressive figure! The last figure is wearing a motocross helmet. Note that his shirttail has come untucked.
Now we have the Franken gang. Obviously, some weird stuff goes on in the labs on the island of Artigo.
On the left, we have Hamlet, addressing Yorrick, who seems to be replying! His arms are of two different sizes, and he is stitched up on his abdomen, and has metal pieces covering his backbone.
Next we have the first pieced together boy. I had a lot of fun painting different skin tones at each joining. A real Frankenstein monster!
Next we have the fellow doing Tai Chi. He also has different sized arms, is stitched up the front and has metal covering his backbone, or perhaps it is his backbone.. It reminds me of a joke by a long-gone comedian, Chris Rush, which I won't explain. And the final construct. I went with metal staples fastening the parts together, and pale blue plastic for kneecaps and other parts.
All of these gangs are covered in the upcoming add-on to the rules.
And some GW topless barbarians from 1985 & 1987! They were named on their slotta tabs.
They will be added to my barbarians!
Finally, two more Amazons, who were misplaced. So easy to paint, other than their shield design.
About all you can do with painting these figures is give them different shield designs, hair, and skin tones. I know others might go wild with tattoos, but I'm not that guy. And yes, per James Bond, the collar and cuffs match!
Subscribe to:
Posts (Atom)


